How to install OpenATV and OScam for satellite receiver and connect to the remote OScam server and secure it together with OpenWebif
This tutorial will be about installation of latest version OpenATV (during writing of this article version 6.2) for Enigma2 compatible Linux Satellite receivers and installation of OScam (CAM software). Later OScam will be configured to connect to external OScam server and secured by password together with OpenWebIf.
![]()
In this tutorial I assume you have already running OScam server (if not check this post) and you want just connect OpenATV satellite receiver to the remote OScam server. You already pre-created user and password on remote OScam server for the client who we will configure below.
![]()
- Download latest version of OpenATV here. Choose your vendor while selecting OpenATV image.
- After you downloaded .zip file, unzip the file.
- Format USB stick as FAT32 and copy unziped file content to the root of the USB stick (if you use VU Plus, it should be “vupus ” folder, for Amiko Viper Combo it will be “vipercombo ” folder, etc. Do not copy content of unzipped folder but whole unzipped content).
- Power off your satellite receiver.
- Insert USB stick into satellite receiver and power on satellite receiver. Display on receiver will show something like “Press Power button to flash image”, or different symbol like “UPD” – press power button and satellite receiver will start with flashing of the image (it can take up to 10 minutes, depends on speed of USB stick and satellite receiver).
- After successful flash of image you should see welcome screen and initial configuration of environment. Maybe you will need to eject USB stick after successful flashing of device.
- Proceed with initial configuration and be sure to check if satellite receiver can communicate over the network (it has assigned IP address by DHCP server or you assigned static IP address).
- Now you will need to connect via SSH to the satellite receiver by your computer.
- For Windows use putty and enter IP address of satellite receiver and press open
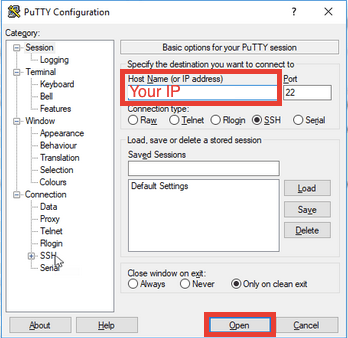
- As username use root if prompted
- For Linux or macOS start terminal and type:
- For Windows use putty and enter IP address of satellite receiver and press open

ssh root@IPAddress
- From beining OpenATV comes without password set for root user. Set password for root user by following command (save the password. Password won’t be shown during typing):
passwd
- Switch back to the computer
- Download Softcam plugin for OpenATV from into computer identified by name (you will need forum account):
- For non-4K receivers (Forum thread with latest version): enigma2-plugin-softcams-oscam.emu-11392**_openatv_all.ipk** – Local mirror
- For 4K ARMv7 receivers (Forum thread with latest version): enigma2-plugin-softcams-oscam.emu-11392**_openatv_armv7ahf-vfp-neon.ipk** – Local mirror
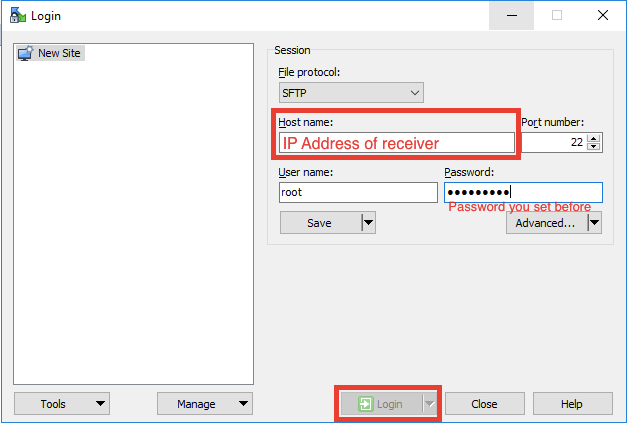
- Upload ipk file into receiver into /root folder:
- Windows – Download WinSCP and connect to the receiver IP
- Linux/macOS – Open terminal and use scp command (instead of XYZ.ipk use downloaded real file name and real IP address of receiver instead of 192.168.0.100)
- Windows – Download WinSCP and connect to the receiver IP
cd ~/Downloads/
scp XYZ.ipk 192.168.0.100:/root/
- After a file was succesfully copied **Switch back to the SSH console of receiver
** - Install Softcam OScam .IPK package (replace XYZ.ipk by real name of ipk package you copied to the receiver before) :
cd /root
opkg install XYZ.ipk
- After successful installation of package edit oscam.server file:
vi /usr/keys/oscam.server
- And replace whole content by this (modify yellow marked lines by your configuration) :
- Remeber:
- device – this is IP address of remote OScam server. Change it to your remote OScam server IP. A “30000” is default port of cccam protocol you have open on remote OScam server.
- user – username of user who is registered in remote OScam server
- password – password of user who is registered in remote OScam server
- Remeber:
[reader]
label                         = cccam_server
protocol                      = cccam
device                        = 192.168.1.100,30000
user                          = USERNAME
password                      = PASSWORD
inactivitytimeout             = 30
group                         = 1
cccversion                    = 2.2.1
ccckeepalive                  = 1
cccreshare                    = 1
- After you modified file, reboot receiver:
reboot
- Go physically to the satellite receiver , press menu button on remote controller and navigate to the Information Panel > Softcam-panel. On the screen you should see something like “Setting CAM1 – no cam“. On the remote controller press right arrow , it should change from “Setting CAM1 – no cam ” to “Setting CAM1 – OSCam.EMU 11392 “. On remote controller now press Green button (ReStart) to start installed OScam. When successfully configured you should see “CAM1 active: OSCam.EMU 11392 “.
- I recommend to enable Softcam stuck prevention. Go again to the **menu > Information Panel > Setting Softcam panel > **enable there prevention against stucked/frozen softcam.
Done. Our satellite receiver will start communicate with remote OScam server.
To secure OScam portal on satellite receiver and OpenWebif portal proceed with following:
- Go to the http://SatelliteReceiverIP :8888
- Click to Files > oscam.conf
- Look for section “[webif] ” and set httpuser and httppwd:
[webif]
...
httpuser = root
httppwd = MySecretPassword
...
- Click to save button
- To secure OpenWebif on http://SatelliteReceiverIP:80 go physically to your satellite receiver and press Menu > Plugins > openwebif > **Enable http authentication: Yes
** - Now you will authenticate to OpenWebif portal by password you set in the begining of the post for root user (like in system via SSH).